Friday-Five-Blog-02-26

Wordpress makes things easy, but there are times you just need to know some basic HTML. For the most part, you may never need these tips, you’ll have someone else do it for you. Not a problem! Some of you take pride in being able to do the little things yourself.

Links

When making a blog post you just highlight the words and click the link icon. Easy, right? Now let’s learn to type it out. Links are made using the <a> tag. An html link looks like this:
<a href=”http://domain.com”>Your Text</a>
First you create your link, then type the words that should be link, then close it up with </a>. There are things we can add to the tag to make the link open in a new window and such, but we’re just doing basics right now.

Images

Images are created using the <img> tag. Your image will need to be uploaded to your website and you’ll need the link for it. The html for an image looks like this:
<img src=”http://domain.com/image.jpg”>
Similar to a link tag, there are things we can add to the img tag, but that’s beyond basic for today.

Paragraph

Paragraph tags are used to create a new paragraph. This places a space between your lines of text. When using the paragraph tag, you’ll want to “open” it at the beginning of your paragraph and then “close” it at the end. To open the paragraph, type: <p>. Yep, only three characters. Next you’ll type all of your text and then add the close tag: </p>.

Line Break

Line breaks simply move your text down to the next line. Unlike paragraphs, there is no space between your lines of text. To create a line break, go to the end of your line of text and type: <br>

Center

There are many ways to center text and images. I just want to show you the quick and easy way, just open the <center> at the beginning of the item you want to center, and close it at the end with </center>. If you wanted to center an image you could do this: <center><img src=”http://domain.com/image.jpg”></center>

There you go. Five basic html codes to help you out. Of course, as always, you may certainly drop me an email asking me for the code to create a link, etc. I don’t mind answering those questions at all.

Google-Analytics-Add-User-bl

Google Analytics can be a confusing frontier. You know you should be using it, but you have no idea how. There is no shame in asking for help!

But, did you know you can give access to your Google Analytics without giving access to your entire Google World? You can. Here’s how.

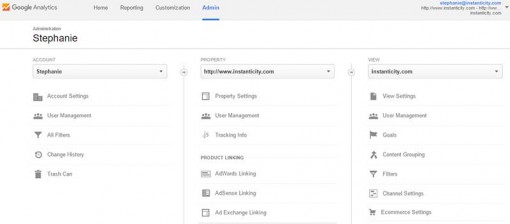
Head over to Google Analytics and click on Admin. You’ll see three columns- Account, Property and View.

When you added your website to GA, you had to set up an Account and then a property. Think of the account as the cookie jar and the property as the cookie. You can give access to only a cookie or the entire cookie jar. (Nope, not craving a chocolate chip cookie at all.)

How you organize your Property and Account is entirely up to you. Personally, I have an Account for each client and then their websites under that.

google-analytics-admin

Decide whether you want to give access to only a Property or an Account and click on User Management in the appropriate column. I suggest Account level access.

Account Level Access – a user can add other users, add additional websites, links Adwords an Adsense.
Property Level Access – a user can access the tracking code for your website, adjust retargeting data and adjust settings on the specific website only.
View Level Access – a user can only add and view goals.

Now you see a list of users and a box to Add permissions.

google-analytics-add-user

Insert your user’s gmail (or gmail managed, like Google Apps for email) email address. Go ahead and tick the box to notify user by email.

Now you need to select the level of permission. Your choices are:

  • Manage Users: This user can add/delete other users, including assigning their permissions
  • Edit: This user can add/edit/delete accounts, properties, views, filters, goals, etc and see report data
  • Collaborate: This user can create and share personal assets, collaborate on shared assets such as editing a dashboard or annotation. This includes Read & Analyze.
  • Read &  Analyze: This user can report and configure data, and manipulate data within reports, create and share personal assets, see shared assets, but can not collaborate.

My suggestion: tick them all except maybe Manage Users.

Click Add and you are DONE. That was easy, right?

wordpress all in one seoSeveral of my clients are running the plugin All in One SEO on their wordpress sites. You are probably one of them! While I have set up this plugin for you, it’s important that you take the extra steps when writing your posts and pages to put this plugin into use.

After writing your post, before publishing, you need to scroll down to the All in One SEO box and fill in the meta-goodness that Google needs to rank your site. You should try to use a keyword or phrase in your page title, description and even in the first paragraph of your post. Remember not to keyword stuff, use words and phrases relevant to your content that your site visitors will use to find, not your website, but this particular page of your website.

This video is a simple guide to show you what you need to do while using All in One SEO. I hope to get another video made about the default settings of AIOSEO very soon!

It’s no secret I’m a big Firefox fan. I rely a lot, maybe too much, on Firefox for my browsing. There are so many useful extensions and Firefox sports the best ad blocker I’ve come across. Yes, I use Firefox to remember passwords to countless sites. There often comes a time when I need to use a different browser and I have no clue what my password could possibly be. Thankfully Firefox makes it super easy to view the password you have saved while visiting a login page.

Navigate to the login page of the website. Right click anywhere on the page and select “View Page Info”

In the pop up window, click the security tab and then the “View Saved Passwords” button

In the next pop up window you’ll see all the usernames you have saved associated with this particular login page. You’ll see a button at the bottom to “Show Passwords” which will enable a password column for you to view the passwords.

Now you can view all of your saved logins for any site.

Spread Firefox Affiliate Button

Sometimes you just need to collect information on your blog users. Collecting information can help you appeal to your visitors, the more you know, the more you can cater to them. The standard Wordpress registration simply collects username and email. How about offering your users the ability the set their own password upon sign up? Enter Register-Plus and it’s sister app Pie-Register. It’s my understanding that Register-Plus is no longer being updated and Pie-Register is the new version. For that reason, I’m going to focus on Pie-Register here, though in my experience, both plug ins seem identical.

Download and install is fairly easy, as well as setting up the needed fields. I covered a lot of that in a previous post. Today we’re going to focus on matching up Pie-Register’s form fields with WP’s standard form fields. On initial install, you’ll find that the form field is on the left and the label is on the right. Standard forms are opposite that and now is not the time to break from standard and confuse your registrants!

The problem lies in the form set up in the file pie-register.php. You’re going to need an editor, I recommend Notepad++. You could use the Wordpress built in editor, but it doesn’t show you line numbers. In that case, you’ll need to search to find the correct area to edit. A great editor will help you immensely for this part.

Open the file in your favorite editor and find the coding for the form. The form begins around line 1254. You’ll need to know a bit about form structure. Each form field should have a label and then it’s field.

Bad code:

[php] <div style="clear:both"><label><?php _e(‘First Name:’, ‘piereg’);?> <p><br /><br />
<input autocomplete="off" name="firstname" id="firstname" size="25" value="<?php echo $_POST[‘firstname’];?>" type="text" tabindex="30" /></p></label><br /><br />
</div>[/php]


Good code:

[php] <div style="clear:both"><label><?php _e(‘First Name:’, ‘piereg’);?></label> <br /><br />
<input autocomplete="off" name="firstname" id="firstname" size="25" value="<?php echo $_POST[‘firstname’];?>" type="text" tabindex="30" class="formfield" /><br /><br />
</div>[/php]

All I’ve done is move the </label> up where it should be, closing the label name. Then we remove the <p> and </p>, no need for paragraphs in a form. The final step is adding a class to the form field, class=”formfield” in this case, so we can style it as needed. In your css file, you can now add declarations for .formfield to get the styling that you need. You’ll need to do this for each form field in the file. In the end, you’ll be left with a registration form that looks nice and fits your website perfectly.

Sometimes you need more than the standard Wordpress register page. What if you want to screen your users or verify them before allowing them to post. This was the case for one of my clients. Her Wordpress based site was a directory using Apptheme’s Classipress and before users submitted listings, she wanted to screen them to make sure they were good enough. We needed a way to verify users before approving their registration.

In the past, I’ve used Register Plus on Wordpress installs to force users to enter an invitation code upon registration. This is great for family or small group sites. However, Register Plus is no longer being supported and development ended in 2008. A new version of Register Plus has come into existence, Pie Register. Pie Register has all the same features and a few bugs.

Pie Register allows users to set their own password, an invitation code, visual verification code, extra registration fields and custom fields. We only needed the password, first and last name and website. This way she could check out her users and either approve or reject them. Remember, she’s only looking for the best.

Install of Pie Register is just as easy as any other Wordpress plug in. Setup is fairly easy and self explanatory. Going down the set up page, we allowed registrations to set their own password. This way upon approval, when they return to the site, they wouldn’t need to go looking for the email containing a random password. Because we’re using Classipress, our log in and registration page are already themed to the site so there was no need to enable Custom Logo. We did need Admin Verification and enabled Simple CAPTCHA. The next thing we did is check Additional Profile Fields for First Name, Last Name and Website, and we required these fields upon registration.

Pie Registration allows you to customize your User Notification Email. This is the email received by the user upon registration. This was an important edit because the user needed to understand that there is a verification process and could take up to two days. I made sure that the email included username, password, user’s website and a link back to the site, as well as a little notice about the verification process. Here’s what our customized email looks like:


Next up was customizing the Admin Notification Email. This is the most important part. How will you screen users if you don’t have their information? It was very important to include the user’s website in this email. Any other important information that might be necessary for approval should also be included, like first and last name.

Now you’re all set up! There is an area here for custom CSS, however it doesn’t seem to work. I seemed to only get results by adding the css to my regular css file, in the case of Classipress, the custom.css. Don’t spend too much time and frustration trying to style your fields here. I have not tested this with a regular Wordpress install, but since Classipress is simply a Wordpress theme, it seems to be it wouldn’t work.

Next up, Styling Pie-Register Registration Fields.

I consider myself still a bit of a newbie with Illustrator and I’m determined to learn more tips and tricks. Today I decided to follow along with this tutorial, The Secrets of the Appearance Panel: Multiple Fills, over at VectorTuts+. The things you can do with only one simple shape is amazing. This cute little spring scene was a perfect project for this cold winter day.

I look forward to doing many more of the wonderful tutorials I’ve found here. Do you have any great Illustrator learning sites to share? I’d love to hear them.